


Prep Series Week 2: Water (Storage) is Life


This is part two of our ten-part toolkit series providing a step-by-step guide about how to prepare for disaster. This series is co-written by Elizabeth Doerr, Cramming for the Apocalypse founder and writer and Brekke Wagoner, host of the Sustainable Prepping Youtube Channel. Our goal for this series is to push through the cognitive dissonance keeping many people from preparing for disaster. We believe that disaster prep is also a way to build resilience and act of taking responsibility and care of your community. You can find all published articles in the series in the “Resources and Toolkits” section linked at the top of the homepage. If you have any questions along the way, feel free to comment below and/or email us at crammingfortheapocalypse@gmail.com. Happy Prepping!
You know the cliche: water is life. Well, it’s not cliche for nothing because it is absolutely true. We cannot survive without water. A healthy adult can live up to three weeks without food, but only about three days without clean water. So focusing on water first is essential to your health in a disaster.
To get started on water storage, download this week’s workbook here:
How to Calculate Your Water Needs
The key is to have a diversity of water options and storing enough for 7-14 days of water for your household while also having backup purification and filtration options.
Begin with this formula: one gallon per person per day. This amount provides for a combination of drinking and hygiene water; however, if you plan on using dehydrated or freeze dried foods in your food storage, we recommend adding half to one full extra gallon to that calculation. For example, a family of four needs 28 gallons for a week of water; you could easily round up to 30 gallons to add in extra water for rehydration.
Don’t forget to calculate pets into your water storage! Dogs usually need about one ounce of water per pound of body weight, and cats need about 8 ounces for every 10 pounds of bodyweight per day.
Note: The Workbook has a handy guide to help you calculate, esp. for the mathematically challenged (like Elizabeth).
Water Storage
Once you have determined how much water your household needs for a one- to two-week plan, it’s time to consider how you’re going to store it. While it’s tempting to buy flats of water bottles, or even the single gallon jugs, these are not a great investment of your money or time.
First, small water bottles don’t actually have much water–a standard flat only has about 3 gallons, which would require storing ten or more flats for most households. Also, single use plastic is not designed for long-term storage and will degrade over time, releasing microplastics into your drinking water and possibly rupturing and leaking. Once used, they just create trash–and we want to cut down on waste as much as we can (there will be no garbage pick up in a disaster!).
What I recommend is to look for opaque, food grade containers with a close sealing lids.
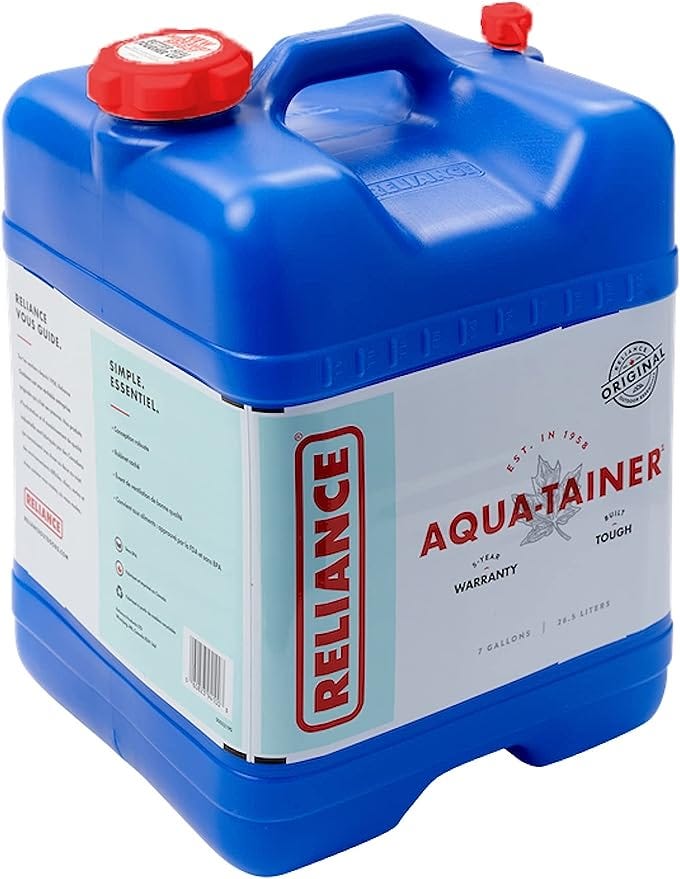
Camping water jugs are the best bang for your proverbial buck; they can be purchased easily, come in a variety of shapes and sizes, and don’t have to be overly expensive (as of the writing of this, they range from about $15-18 USD). If you want something that can take a rough beating, military-grade water jugs are twice as costly, but will last a lifetime.
Some of these water jugs are stackable which can be handy for space saving reasons; Aqua-Tainer is a great option for stacking and durability.
If you have mobility limitations and can’t lift a 5-7 gallon jug (water weighs about 8.34 pounds per gallon, so 5 gallons is 41.7 pounds), then consider investing in WaterBricks. They are more costly, but come in 1.6 and 3.5 gallon sizes and are stackable up to five tall.
Once you have your water storage, then we want to protect it from the elements. Keep water away from vents and heating registers – extreme temperatures including heating and freezing can damage your containers, making it more prone to contamination. Heat especially can promote the growth of bacteria in your water. We also want to prevent sunlight reaching your water (especially if your container is not opaque), and we want to keep the container off of concrete, which can leach chemicals into your water.
Clean out your new containers with hot soapy water or ¼ tsp of unscented bleach to 1 quart of water. Swish around the container until everything is sanitized and rinse until any bubbles come clean. Then fill with your household tap water (if using a hose to fill your buckets do not use a garden hose as those often contain lead; opt for an rv hose instead).
BOOM! Now you have water storage!
Plan to rotate every 6-12 months. If ever in doubt about water contamination, purify and/or filter your water before drinking.
A note about water storage: You do not have to store all the water you need all at once. If you can only manage getting a couple of Aqua-tainers or even buying a couple of plastic jugs every once in awhile from the grocery store, then that’s great. Just do it as you go in a way that feels manageable to you. In the end, you can aim for the storage elements above as your end goal.
Check out this video for a more in-depth walk through on water storage.
Water Purification
In the event that a disaster causes your water service to be cut off for longer than you have water storage, you’re going to need to collect and purify and/or filter your water.
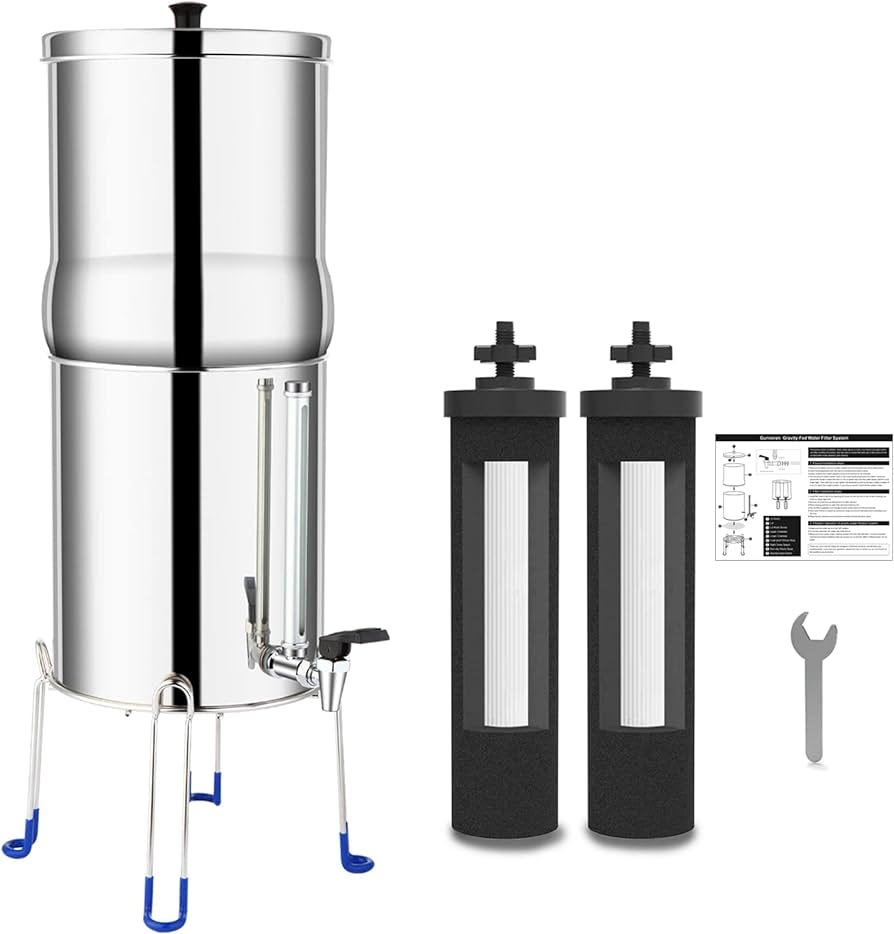
My first suggestion is to purchase or make a gravity fed filtration system (since it’s likely power will still be out). Filters will not only prevent bacteria in your drinking water, but can help filter out some toxins like pesticides or insecticides that may be in your collected water. These will not be removed from boiling (2 minutes at a rolling boil), bleaching or other chemical means of purification. So, if in doubt, spend your money on a good filter first that meets your household’s needs. Remember you’re going to prepare to filter at least 1 gallon per person per day, so small straw filters won’t be of as much use in this scenario.
If you want to include chemical purification in your preps, here are 3 options:
Bleach – yes you can use household bleach to purify water. However, you must use plain, unscented un-fancy bleach. For every 2 gallons of water, you need ¼ tsp of 6% or ⅛ tsp of 8.25% plain bleach. Let stand for at least an hour. Remember that bleach is not shelf stable long term, so consider that as you plan to store chemicals for purification.
Iodine – a 2% solution of iodine can be made up using 5 drops a quart or 20 drops a gallon, let stand for at least an hour.
Pre-mixed solution or tablets (like AquaPure) – use as directed to kill bacteria and microbes.
These are good back ups to your filtration system, but remember they will not remove heavy metals or other chemical toxins from your water. So be mindful where you source your water, make sure to pour it through a coffee filter, bandana, cheese cloth, or other filter to collect debris, and then take care in the purification process.
If you want more information about Water Purification and Filtration, check out this video.
UPDATE as of March 2025: We do not have a specific recommendation for gravity-fed water filtration brands. The brand (Berkey) that Brekke first recommended has been found to be unsafe with the levels of silver found in the filter. We are currently on the hunt for a good gravity-fed system to recommend. Stay tuned.
Sneaky sources of water in a pinch
There are also some sneaky sources of water in your home if a disaster strikes and you don’t have enough stored. Consider the water in your hot water heater (if you have one with a tank), water in your toilet TANK (not bowl, y’all!), ice in your freezer, and juice in canned veggies and fruits. If you have access to a pool or hot tub, consider this for sanitation water, but don’t plan to drink it.
Rainwater catchment systems can also offer a possible renewable source of water, but like all other forms of water that you gather, it must be filtered and purified before drinking.
If you take one step toward being ready for the next emergency situation, it should be water. Water is often taken for granted but it’s essential to life. Make a plan for what you can afford, and where you can store your water and get to it!
Action Steps
As we noted above, you don’t need to do this all at once. This is the goal you’d like to aim for, but as mentioned in week one, some water is better than no water. With that, download this week’s workbook and take the following action steps:
Calculate how much water your household will need for 7-10 days. There’s a handy table on page 6 of the workbook to guide you through the calculations.
Decide where to store your water. Prompts on page 7 of workbook
What storage method will you use? Prompts on page 7 of workbook
Complete the water storage checklist. Prompts on page 8 of workbook
Stock up on water purification tools. See list of options on page 8 of the workbook
Discussion
Let us know what you’ve been doing for water storage. What questions do you have? Is there anything confusing to you about any of the above? Let us know in the comments!
 | A guest post by
|
I've got the 5 gallon opaque stackable containers in my basement on wooden slats. I previously had 16, but I just got another 8. Just have to fill them up! Two adults, one bunny in residence, but I figure I should take into account my neighbors and less prepared friends...